
Installing elsieOS
From a USB stick to a running machine. The download opens with the beta, scheduled for December 1, 2026 - join the beta to be told; the download page and the key fingerprint this guide mentions are published with it. Everything from the first start on has been run in virtual machines; writing a real stick and starting real PCs from it will be checked before then.
elsieOS turns a PC with an NVIDIA graphics card into a machine that runs AI models and AI apps for your home or office: chat models (served the way Ollama serves them, so the apps you already use keep working), ComfyUI for images and video, and more apps from its catalogue. It has no desktop: you use it from your other computers and phones, and its own screen shows what it is doing.
This guide takes you from a downloaded image to a running machine. Most of it is done once.
1. What you need
- A PC with an NVIDIA card, compute capability 7.5 or newer: GeForce GTX 16 or RTX 20 and later (RTX 30, 40, 50), or the matching workstation cards. 8 GB of graphics memory or more (6 GB works with small models).
- RAM: 16 GB at least; 32 GB or more is recommended (with 32 GB elsieOS keeps the models you are not using ready in memory and switches between them in about a second; with 16 GB a switch reads the model from the drive).
- A drive of 256 GB or more for elsieOS and the models. Everything on the drive you choose is erased.
- UEFI firmware (every PC from about 2012 on). The old "Legacy" or "CSM" boot is not supported.
- A USB stick of 64 GB or more (it runs elsieOS before it is installed; smaller sticks are not enough).
- Another computer to download the image and write the stick, and later to use elsieOS from.
- A network cable. elsieOS has no Wi-Fi setup yet.
elsie hardware on the stick (step 5) checks the PC against this list.
2. Download the image
Download the elsieOS image and its checksum from the download page on elsieos.com. Check that the download is complete and unchanged: the SHA-256 of the file must be the one printed next to it.
- Windows (PowerShell):
Get-FileHash elsieos_VERSION_x86-64.img.xz -Algorithm SHA256 - macOS:
shasum -a 256 elsieos_VERSION_x86-64.img.xz - Linux:
sha256sum elsieos_VERSION_x86-64.img.xz
3. Write it to the USB stick
Everything on the stick is erased.
- Windows or macOS: balenaEtcher (choose the file, the stick, Flash). On Windows Rufus also works: choose the file and, if asked, DD image mode.
- Linux:
xz -dc elsieos_VERSION_x86-64.img.xz | sudo dd of=/dev/sdX bs=4M conv=fsync status=progress(check the stick's name withlsblkfirst: the wrong name erases another drive).
4. The PC's firmware settings
Open the firmware settings (often Del, F2 or F10 right after switching on; on Windows 11 also Settings > System > Recovery > Advanced startup > Restart now > Troubleshoot > UEFI Firmware Settings).
- Boot mode: UEFI (switch off "CSM" or "Legacy").
- Secure Boot: on, with the standard keys - the way PCs come from the shop. elsieOS starts through a small program signed by Microsoft (the "shim", the same one Debian uses), so Secure Boot can stay on and Windows on the same PC is not affected. Some PCs, mostly laptops sold as "Secured-core", only trust Microsoft's own Windows key: look for a setting called "Allow Microsoft 3rd Party UEFI CA" (Lenovo, Dell, Microsoft Surface and others) and switch it on.
- Or Secure Boot off. elsieOS also runs with Secure Boot switched off; then the blue screen in step 5 does not appear. You can switch it on later (
elsie securebootsays how).
Save, and start the PC from the stick: the firmware's boot menu key (often F12, F11, F8 or Esc) lists it, sometimes as "UEFI: " and the stick's name.
5. The first start: let the PC trust elsieOS (once)
With Secure Boot on, the first start from the stick shows a blue screen. This happens once per PC: the firmware trusts Microsoft's keys, and you now add elsieOS's key to the list the shim keeps (the "MOK" list). Nothing else on the PC changes.
- "Verification failed: (0x1A) Security Violation" - this is expected (the PC does not know elsieOS's key yet). Press Enter (OK).
- "Press any key to perform MOK management" - press a key within 10 seconds (the bottom line counts down). If you miss it, the same error comes back and waits; if the PC then starts something else, switch it off and start it from the stick again.
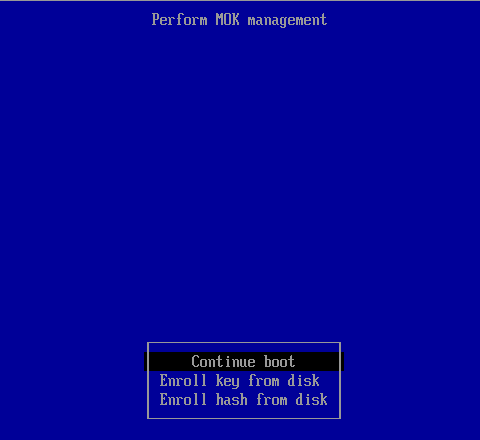
- Perform MOK management: choose Enroll key from disk (arrow keys, Enter).
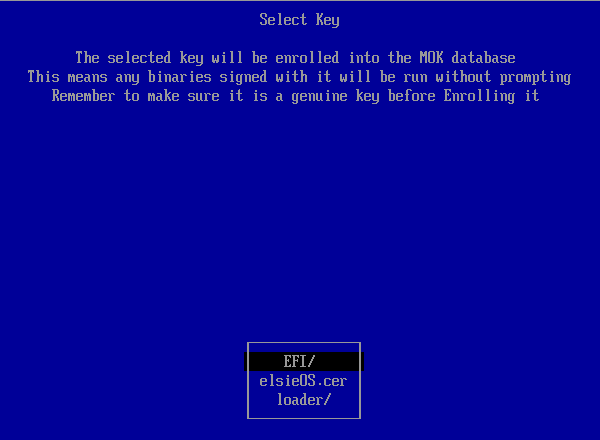
- Select Key: choose the drive shown (it is the stick's boot partition, called ESP).
- Choose the file elsieOS.cer.
- [Enroll MOK]: choose View key 0 to look at the key. Its Fingerprint must be exactly the one published on elsieos.com. Press a key to go back, then choose Continue.
- Enroll the key(s)? choose Yes.
- Choose Reboot.
The PC starts again, this time all the way into elsieOS. From now on it starts elsieOS without asking, from the stick and later from the drive you install it on.
6. elsieOS on the stick: claim it
elsieOS now runs from the stick. Its screen shows the welcome menu: the machine's address, a code of 8 digits, and a fingerprint.
- From a phone or laptop on the same network: open the address shown (https://...). Your browser warns about the certificate (each elsieOS machine makes its own): compare the fingerprint on the page's certificate with the one on the screen and continue. Type the code. The first step sets the machine's password - this claims the machine (from then on the code no longer works, and the password is needed).
- Or at the machine: use the menu with the keyboard (type a number and Enter). The first item sets the password.
7. Install it onto the PC's drive
From the welcome menu (Install), the browser (while the machine is not claimed yet - install first, then set it up), or the command elsie install:
- Choose the drive. Drives that cannot be used are shown with the reason (the stick itself, too small, in use).
- elsieOS shows everything that will be erased on it (for example a Windows installation) and what it will get.
- It asks whether to bring your settings along from the stick (your password, SSH keys, network settings, time zone, update settings, and any models already downloaded). The new machine always gets its own identity.
- To confirm, type the drive's serial number (shown on screen). Nothing is erased before that.
- It copies elsieOS (about a minute), checks the copy, and offers to make the PC start from that drive.
- Take the stick out and restart.
8. Set it up
The installed elsieOS starts in about half a minute. Open the dashboard in a browser (the address is on its screen), or use elsie menu / elsie setup at the machine or over SSH. Each step explains what it changes:
- Name and network (automatic or a fixed address).
- Remote access with Tailscale (a QR code to scan) and SSH keys (elsieOS has no password logins over the network).
- Models:
elsie models cataloguelists tested models rated for your card ("fits", "with a shorter context", "too big");elsie models get NAMEdownloads one. Apps that talk to Ollama use them athttp://MACHINE:11434. - Apps:
elsie apps- Open WebUI, ComfyUI, SillyTavern, LibreChat, AnythingLLM, Whisper, Kokoro, InvokeAI, SwarmUI. - Backups:
elsie backup catalogshows where backups can go (a USB drive, another computer, a cloud). Save the recovery file it gives you: with it,elsie restorebrings the whole machine back on a new drive. - Updates:
elsie updates channel betafollows elsieOS's public updates (elsie updates autodecides whether they only show up or also install themselves at night). A new version that does not start healthily is undone by itself.
Coming from Ollama or ComfyUI on another system
elsieOS reads your old models and ComfyUI files without changing anything on the old system:
- On another drive of the same PC (Linux, or Windows - shut Windows down fully first: hold Shift while choosing Shut down, because Fast Startup leaves its drive in use):
elsie models importandelsie apps import comfyuifind them by themselves. - On a USB drive: plug it in, same commands.
- On another computer on your network:
elsie models import --from sftp://USER@COMPUTER(andelsie apps import comfyui --from sftp://USER@COMPUTER). That computer needs SSH switched on: on Windows Settings > System > Optional features > OpenSSH Server, then start the "OpenSSH SSH Server" service; on a Mac System Settings > General > Sharing > Remote Login; on Linux theopenssh-serverpackage. elsieOS asks you to confirm the computer the first time, then for the user's password (or uses an SSH key), and only reads.
When something goes wrong
- The PC does not start from the stick at all, or says the image is not signed, without a blue screen: the firmware does not trust Microsoft's third-party key - switch on "Allow Microsoft 3rd Party UEFI CA" (step 4), or switch Secure Boot off.
- The blue screen comes back on every start: the key was not enrolled - follow step 5 to the end (Yes, then Reboot).
- "no NVIDIA card found": check the card is seated and powered;
elsie hardwareshows what elsieOS sees. - No network:
elsie networkshows and changes it (a cable is needed: no Wi-Fi setup yet). - An update went wrong: elsieOS goes back to the version before by itself after three failed starts;
elsie rollbackgoes back by hand. elsie statusshows what is going on,elsie logsthe recent problems,elsie helpevery command.- Shorter to type:
eworks in place ofelsiewith every command (e status,e install,e help).